Ok, keep in mind that this page has all of the images on it, so it'll take a while to load.
Yes, you heard me. Ball up a sheet of newspaper and just keep adding layers of newspaper onto that ball until you have a newspaper ball the size of your face. There are two reasons why it'd be good to do this. The first: you won't need as much clay since the bulk of the core of it will be newspaper. Second: It will make your clay mold a little lighter, which is extremely helpful if you're going to have to move it around a lot.
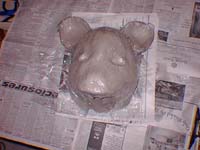
Once you're satisfied with the size and shape of the ball of newspaper, place it on your work area (a table covered in newspaper will do) and start to cover it with clay. You're not trying to shape your mask yet. You're just trying to get your clay on so don't worry about sculpting it exactly right.
Now comes the fun part. Start adding or taking out bits of clay from the formless mound you have now and let the animal come out. My biggest problem was that I couldn't get the ears to point right to be feline ears, you can see that they came out more rounded than a cat's ears should be. If I had more time, I would have been able to fix it, but I had a deadline to keep. I do plan on making a more realistic mask later on, using the same techniques.

The next thing you do is take the clear plastic wrap and layer it tightly on your mask. You do this because you don't want your papier mache directly next to your clay, or the papier mache will never come off. Place the wrap as tightly onto the clay as possible. You want it to fit like a layer of skin.
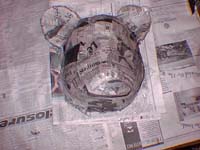
Now you need to place papier mache onto the plastic wrap and therefore onto the clay. Cut your newspapers into 1" by 2" strips. Dip these strips into your paste and then place them tightly onto the mold. My art instructors suggested doing 5 layers alternating newspapers and brown paper bag strips. Not only will this make the mask a little stronger since brown paper is thicker, you'll also be able to see your layering better if you have nicely contrasting layers. Therefore, you'll be able to see where you started and how much you need to do before you finish the layering. Your fifth layer should be paper towel strips, just to give your mask a smooth finish.
Oh, yeah, we all know what this is like. You should give the mask 3 or 4 days to completely dry, longer if you live in a more humid climate like Hawaii. A week, would be ideal.
Ah, your mask is completely dry. Now what? Start by turning your mask over so you can see the newspaper ball core and the layers of clay underneath the papier mache layers. Remove the newspaper core (it should pop right out) and then dig the clay out of the mask in chunks. Fingers can only do so much, so you can also use a spoon, or carefully use a pocket knife to cut the clay for easier removal. You can also lift off the plastic wrap so that the clay underneath it will come off.
If you have something like large ears protuding on your mask, and you can't get to the clay that's underneath them, you can cut through the papier mache to get the clay out, and then repair the cut with more papier mache layers. Remember that this will add to the drying time of your mask, but the papier mache shouldn't take really long to dry now that there's no clay.
This is where your imagination comes in. Use anything you'd like to decorate your mask. Make it as realistic or fanciful as you like. Use anything you'd like. Remember, the craft store and the glue gun are your friends.
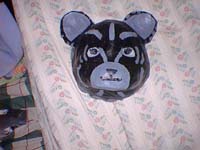
As you can see, I started out painting the mask plain black, but this wasn't working too well. So I decided to add some stripes to it to make it more fanciful. It turned out not to be a representation of my true furry form, but more of a mythical striped creature who came out of my imagination.